
What is Server-to-Server (S2S) Postback, and how do you implement S2S Postback integration between two tracking platforms?
Server-to-server (S2S) postback integration is a method used to track and transfer data between two systems or tracking platforms. Over the past few years, S2S postback has emerged as an unofficial “standard tracking and communication channel” in the affiliate marketing industry, outperforming the traditional pixel tracking due to its superior security, tracking accuracy, and reliability.

To briefly compare, both S2S postback and pixels are utilized to track and share data, such as conversion events, sales, leads, or actions, between two different systems. The primary difference between the two is that S2S postback operates without relying on the user’s device, unlike pixel tracking. This attribute makes it more accurate and reliable than client-side tracking (pixel tracking), which can be impacted by browser restrictions, ad blockers, and other factors.
Setting up an S2S postback can be challenging and confusing, particularly when compared to traditional pixel integration but, if you plan to run an affiliate program or affiliate network, it’s important to have someone on your team who understands how to implement it.
Even some of the most experienced marketers in the industry may find it difficult because of the misunderstandings surrounding the variables that one system needs to pass to another. However, there’s no need to worry because we have created a beginner-friendly guide that will walk you through the process of establishing a basic S2S postback integration between two tracking platforms.
First of all, we will need to understand the structure of the S2S postback URL and how data is exchanged through it, so let’s see some Postback URL examples:
TrafficManager Postback URL:
https://postback.trafficmanager.com/?clickid=__REPLACE__&amount=__REPLACE__¤cy=__REPLACE__&transaction_id=__REPLACE__&key=06c9a03a47b2f37543222310cd84599345c92956ad8
Other tracking platforms Postback URL:
https://trackingplatform1.com/postback/?subid={subid}&amount={amount}¤cy={currency}&transaction_id={trans_id}&key=01234567890abcdefgh
https://trackingplatform2.com/pb/?aff_id=%%aff_if%%&commission=%%commission %%&transaction_id=%%transaction_id%%&key=11223344556aabbccdd
https://postback.trackingplatform3.com/?s1=#s1#&sum=#sum#&transaction_id=#trans_id#&key=01234567890abcdefgh
As you can see, different trackers, and different postback URL formats, no wonder is confusing. However, once we understand their structure and what we need to modify in a postback URL, it will become clearer.
Please pay attention to the parts highlighted with yellow from the section “Other tracking platform postback URL” above and the TrafficManager Postback URL. Those are called dynamic parameters and are used to exchange data.
The golden rule when integrating a postback URL is that: Those and only those dynamic parameters (the section highlighted with yellow) of YOUR postback must be modified with the other side parameters, or fixed values you want to receive in YOUR platform.
As you can see, In the TrafficManager postback URLs, we use __REPLACE__instead of a dynamic parameter like {subid} to make it more intuitive for people to understand which part of the postback URL should be replaced with the other side (tracking platform) parameters.
Now, if we should integrate ANY of the postbacks URL listed above into a 3rd party tracking platform that supports the following parameters (or tokens):
#s1# – clickid 1
#s2# – clickid 2
#s3# – clickid 3
#pay# – payout
#aff_id# – affiliate ID
#tid# – Transaction ID
The postback URL that we need to integrate on the other side should have the variables from the list above (instead of the yellow-highlighted variables) that we want to pass back to our tracking platform.
For example, let’s say we need to integrate the postback URL above highlighted in blue, and we choose the variable #s3# to pass back and forth the unique ID of the affiliate clicks from your tracking platform (Note: check with your partner which variable to use before integrating if their documentation is not clear)
Instead of this:
https://trackingplatform2.com/pb/?aff_id=%%aff_if%%&commission=%%commission %%&transaction_id=%%transaction_id%%&key=11223344556aabbccdd
It will look like this:
https://trackingplatform2.com/pb/?aff_id=#s3#&commission=#pay#&transaction_id=#tid#&key=11223344556aabbccdd
Same for the grey postback URL, instead of this:
https://trackingplatform1.com/postback/?subid={subid}&amount={amount}¤cy={currency}&transaction_id={trans_id}&key=01234567890abcdefgh
It will look like this:
https://trackingplatform1.com/postback/?subid=#s3#&amount=#pay#¤cy=USD&transaction_id=#tid#&key=01234567890abcdefgh
As you can see, nothing changes in our Postback URL besides the variables. In the second example (the grey postback above), we also set a fixed value for the currency because we don’t have a dynamic parameter for it in the list above. Assuming that we will receive payouts in USD, we can directly “communicate” the symbol to our tracking platform or remove the parameter from the postback URL, of our choice.
The same can be done when passing the payout amount of the conversion. For example, we can use a fixed sum such as amount=1.
Here’s an example with the currency removed and a fixed payout:
https://trackingplatform1.com/postback/?subid=#s3#&amount=1¤cy=USD&transaction_id=#tid#&key=01234567890abcdefgh
Note: The only parameter in our case which must always be dynamic is the #s3# parameter because we will pass that from our tracking platform later.
Now, once you have placed your postback in the 3rd party tracking platform, you will need to create an offer/campaign in your tracking platform and in your offer destination URL, to add the partner offer/campaign tracking link you want to integrate into your system, with THEIR parameter used to pass the unique ID’s of your affiliate clicks ( #s3# from the example above).
For example:
Imagine that the tracking link of your partner looks like this: https://track.myoffer100.com/?aff=87&lp=21
And your tracking platform parameter that passes the unique IDs of your affiliate clicks is [subid]
Then your final destination URL will be: https://track.myoffer100.com/?aff=87&lp=21&s3=[subid]
Set it as the destination URL in your tracking platform and let’s test the Postback Integration.
- Open the tracking link resulting from your side (the one that redirects to the destination URL above) and check that both tracking platforms report the click you just made;
- Perform together with your partner a conversion test by using the tracking link from your platform.
- Check if the conversion was registered on both platforms and if you received the correct amount.
Troubleshooting. If the integration isn’t working, consider the following:
Ensure that you’ve correctly set up the “unique IDs of your affiliate clicks” parameter on both platforms (in our example we used the variable #s3# for that).
Ensure that you have used YOUR platform tracking link for the conversion test and not the destination URL received from your partner.
Double-check the postback URL for typos or incorrect placeholders.
Double-check the postback URL for empty spaces, including the beginning or the end of the link, some platforms don’t recognize and remove the empty spaces.
HTTP over HTTPS requests – double check if both platforms send the traffic in the same format, HTTPS is highly recommended.
Now, to provide some context and help you better understand, let’s imagine that you have just set up an affiliate program or an affiliate network using our affiliate tracking platform, TrafficManager, and you need to integrate another tracking platform operated by a 3rd party Advertiser, affiliate program, casino or betting operator, or any other similar entity.
Step 1: Make sure that the other tracking platform supports S2S postback tracking.
This may seem obvious at this point, but in some industries, many trackers still rely on pixel tracking. If this is the case, you can still integrate pixel tracking with TrafficManager, but you don’t need this guide to do it as it’s a simple copy-and-paste operation.
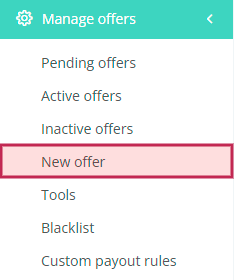
Step 2: Find your TrafficManager global Postback URL
Click on “Manage offers” then on New Offer (or edit any existing offer from your Marketplace)
Scroll down until you find “Conversions tracking” then “S2S Postback” and Copy the Postback URL
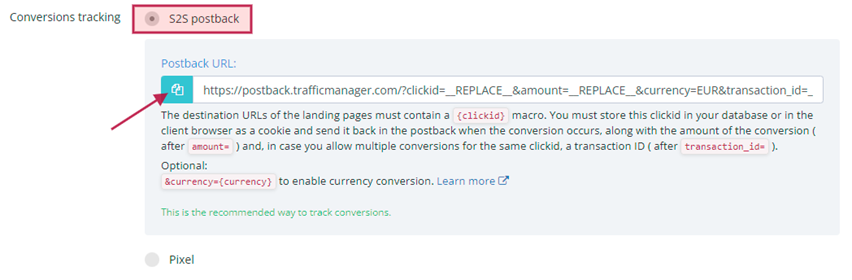
Note: The postback URL provided by TrafficManager will be your global postback URL, which means that you can use the same URL to integrate all your third-party partners, regardless of how many offers/campaigns you create in your TrafficManager platform.
Step 3: Identify the 3rd party affiliate tracking platform dynamic parameters.
For our example we will use the same parameters we used in the examples provided above:
            #s1#
            clickid 1


            #s2#
            clickid 2


            #s3#
            clickid 3


            #pay#
            payout


            #aff_id#
            affiliate ID


            #tid#
            Transaction ID
Step 4: Paste your modified S2S postback URL in the other platform as follows:
https://postback.trafficmanager.com/?clickid=#s1#&amount=#pay#¤cy=EUR&transaction_id=#tid#&key=06c9a03a47b2f37543222310cd84599345c92956ad8

Step 5: Retrieve your partner offer/campaign tracking URL:
For example https://track.myoffer100.com/?aff=87&lp=21
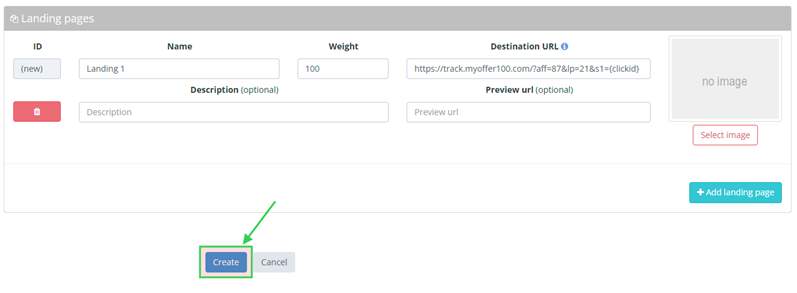
Step 6: Create a new offer/campaign in your TrafficManager tracking platform and add it as a destination URL

Step 7: Add the variable we use to generate unique ID’s for the affiliate clicks {clickid} in the destination URL together with your partner parameter used to receive it on their end which usually is the same you place in the postback URL, but is not a rule:
This is the postback URL:
https://postback.trafficmanager.com/?clickid=#s1#&amount=#pay#¤cy=EUR&transaction_id=#tid#&key=06c9a03a47b2f37543222310cd84599345c92956ad8
This is the complete tracking link for TrafficManager:
https://track.myoffer100.com/?aff=87&lp=21&s1={clickid}

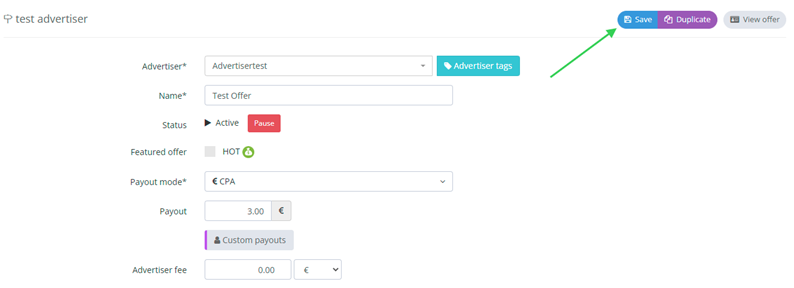
Step 8: Click first on the Create button
Step 9: Then save the offer in your TrafficManager platform
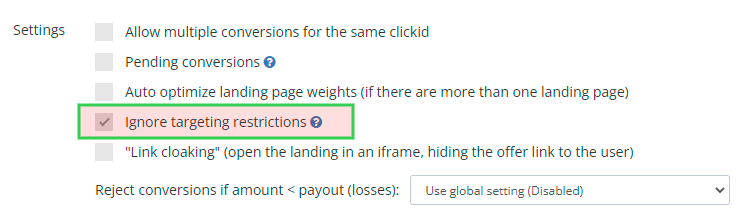
IMPORTANT: For testing purpose, do not activate any of the following filters when you will create the offer in your TrafficManager platform until after the test is done:
Countries, Exclude Countries, Connection type, or, if you already have them activated, check the “Ignore targeting restrictions” box under the offer settings and save the offers.
Don’t forget to remove that once you’re done if you want to activate the filters again.
Step 10: Test your integration using the tracking link generated by your TrafficManager platform
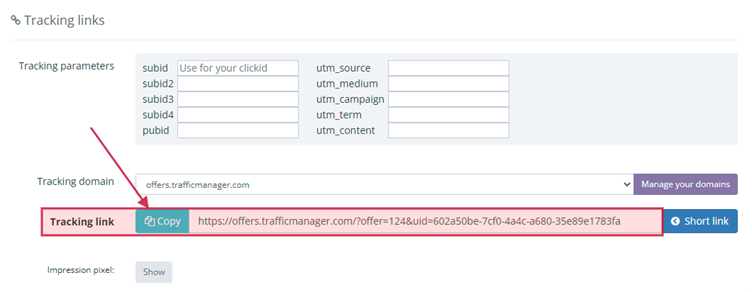
First, open the link in your browser and check if the click you just made is visible on both tracking platforms. If not ask the account/affiliate manager managing the other tracking platform if the statistics are live in their system, otherwise check the Troubleshooting section of this page.
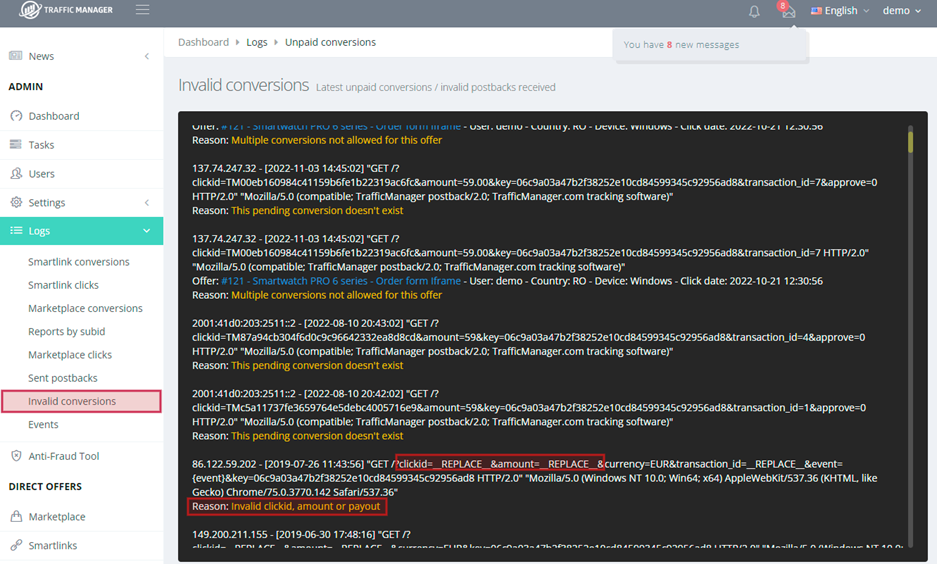
The last step, simulate a conversion by clicking the same tracking link and completing the desired action. (You may need your account/affiliate manager help for this)
If the conversion is not reported correctly, please check the Invalid Conversions section of your TrafficManager platform, and seek the reason for the failed reported conversion:
Hopefully, this guide made your life easier. Thank you for your trust and support and remember to keep an eye on our blog and social media pages for more content like this.
With love,
The TrafficManager Team!